Pricing is setup in RTO Pro by either entering individual prices for each inventory item, entering a times cost markup for inventory categories, a default times cost markup, or an alternate method where you enter the total RTO price and the payment = total RTO$ / # of payments. The individual pricing will always be used if it is present, if not the category markup will be used and if there is no markup setup for the category the default markup will be used (unless you are using the alternate method then that would be used to calculate rate). When doing pricing by category markup you can also setup a discount table to automatically reduce pricing based on formula's you set for pre-rented inventory.
First of all to make pricing come up automatically when loading agreements check the appropriate box in Store Setup under the "Contracts" tab (Suggest an inventory payment rate when loading / pre-loading agreements). Note that you can also password protect the ability to lower prices from the pricing that is setup to prevent employees from renting stuff at lower prices.
Each pricing method will be explained below:
Individual pricing:
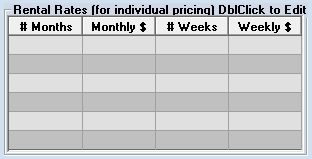
When you receive inventory or from the inventory inquiry / maintenance screen you will see the grid above, you use this grid to enter individual pricing for inventory. Its individual pricing because it only applies to this inventory item only, you can have 2 items exactly the same and price them differently using this method. Below is an example of how to fill in the table above:
# Months |
Monthly $ |
# Weeks |
Weekly$ |
12 |
99.99 |
52 |
25.99 |
18 |
74.99 |
78 |
18.99 |
You can fill in any number of the rows you wish but monthly and weekly pricing must be entered. Semi-monthly would be 1/2 of the monthly price and bi-weekly would be 2x the weekly rate.
Pricing by Category:
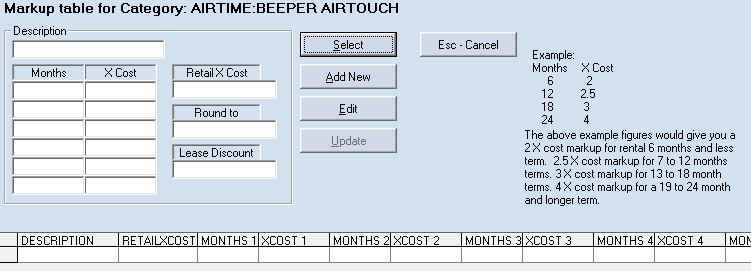
The screen above is where you setup category markups. You can get to this screen by clicking on the "Select Edit Markup" button when you create a new category during the inventory receive process and also from Master Model / Category(inventory menu option 3) to edit markup for an existing category.
Note that if you receive inventory in a category where the markup has not been defined the default markup(if present) will be used that you setup in security(setup menu option 5, see below). All categories not specifically setup with a markup will use this default markup.
Category markup is done as a multiple of cost. The image above has an example to the right that shows how it can be used. To create a new markup record you click "Add New" and fill in the text boxes on the left of this screen. You enter the description for this markup "Normal Markup" , "Appliance Markup" etc. This is just for your reference it can be named anything you like and the same markup can be used for multiple categories if you wish. Then fill in the months starting with the lowest term you offer and how many times cost you want for that term. You can fill in as many rows as you like but they must be ordered shortest term to longest term.
"Retail X Cost" this is for cash price / retail sales, how many times cost to get to your desired retail price.
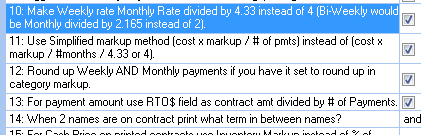
"Round To" If you want the rental rates to be rounded enter what you want them to be rounded to here. For instance if you enter .99 here and the price calculates to be 66.67 it would be rounded to 66.99. This will round the monthly price only. To also round weekly prices, see the Contracts tab in Store Setup and check the box on line 12 "Round up Weekly AND Monthly Payments if you have it set to round up in category markup."
"Lease Discount" If you do leases in RTO Pro and wish to discount the rental rate for leases enter the discount amount here (.2 would be a 20% discount). Leases in RTO Pro are generally discounted up front since there is no early payoff discount on lease agreements.
After filling in all info click the "Update" button to save this markup record, then the select button to select this record for the category you are working with.
Note that when you edit a markup record you affect pricing on all categories that have been attached to this markup. For instance if you receive a refrigerator in category "refrigerator" and create a markup and call it "normal" and set it for the markups you use for refrigerators, then you receive a stove under category "stove" and you edit the "Normal" markup record for the way you price stoves, refrigerators will now be priced the same way stoves are.
You can have as many markups as you like or as few as you like, if you price everything in your store the same you only need 1 markup, in fact you could just setup the default markup in security if you use the same markups for all inventory in your store.
If you used the same figures as in the example on the right of side of the image you would get the following pricing:
Cost 200.00
6 months cost x 2 = 400.00 / 6 =$66.67 per month
12 months cost x 2.5 = 500.00 / 12 = $41.67 per month
etc.
The weekly rate would depend on your settings you have in store setup, either monthly / 4 or monthly / 4.33. Below is a screen shot of these settings and other pricing options, in Store Setup under the "Contracts" tab.
Default Category Markup:
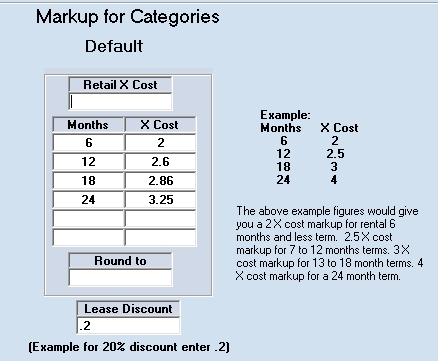
Above is a screen shot of where you setup your default category markup. This can be found in Security (Setup menu option 5), on the lower right you will see the button "Setup Default Category Markup / Pricing". This is setup the same as the category markup except what you put in here would apply to any category that does not have its own markup specifically set. If you price all inventory the same this is the only markup you need to setup.
Alternate Pricing Method:
There is one other alternate method for pricing also, with this method you enter the total RTO price when you receive the inventory and have the rate calculated by total RTO / # of payments. To use this option you have to check the box in Store Setup under the "Contracts" tab: "For payment amount use RTO$ field as contract amt divided by # of payments." Also make sure all inventory has a total RTO price in the "RTO$" inventory field (this is entered during receiving or through inventory maintenance).
Below is an example of how this works:
If a RTO$ = 1000.00
For a 12 month agreement 1000.00 / 12 = $83.33 monthly payment or 1000.00 / 52 = $19.23 weekly payment.
To use this alternate pricing method make sure you check the appropriate box in Store Setup under the "Contract" tab (#13 in the image below).
Note if you check this box all auto pricing will be calculated using this method unless you have individual pricing (see above) setup for an item, in that case the individual pricing would be used.