Setting up store to home office computer connection using a secure tunnel with Zebedee
Zebedee can be downloaded here: http://www.winton.org.uk/zebedee/zbd241Asetup.exe
Zebedee would have to be downloaded and installed on the Home Office computer and any RTO Pro computer you wish to view master inventory records or enable remote payments on.
Setting up the server computer (computer running RTO Pro Home Office)
1. Download and install Zebedee (see link above).
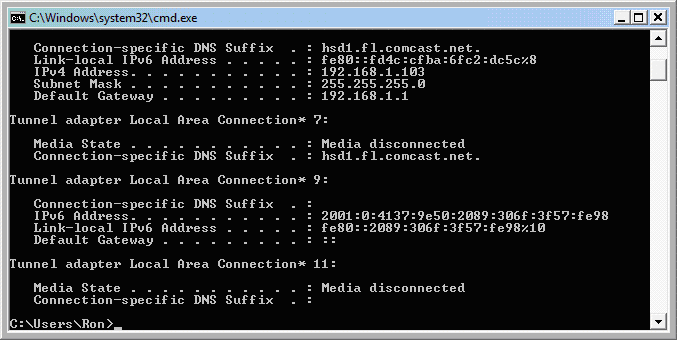
2. Get the IP address of the server computer. Open a command prompt, to open a command prompt in Vista you can click on the Windows Start button and type "CMD" where it says "Start Search" and push enter. From the command prompt window type "IPCONFIG" and a window like below will be displayed. The IP address for the computer this was run on is 192.168.1.103.
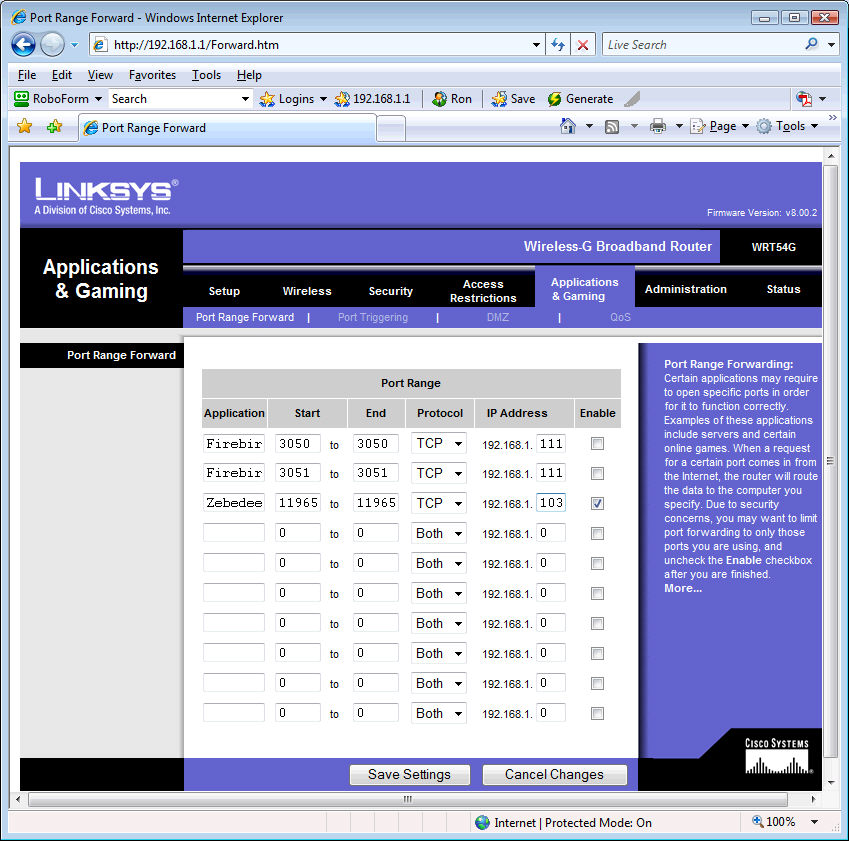
3. Next your router has to be setup for port forwarding for Zebedee. Zebedee uses port 11965 and the IP address to forward to needs to be the servers IP address. See the image below. The 3rd application listed is how it needs to be setup, the only thing that would need to be changed is put your servers IP in the IP address line. Note all routers are different so see your router instructions on how to get to the setup for the router. For the test router we used to get to the setup mode you open internet explorer and type "http://192.168.1.1/" in the address line, then leave user name and password blank (only works if you have not setup password for the router).
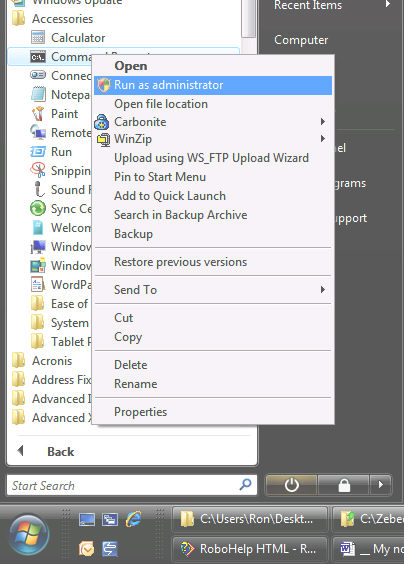
4. Open up a command prompt window, this time it has to be run as administrator so click on Start > Accessories then right click on Command Prompt and click Run as Administrator, displayed below.
5. At the administrator command prompt type the following, push the ENTER key after each line.
cd\program files\zebedee
zebedee -p > store1.key
zebedee -p -f store1.key > store1.id
6. Repeat the 2nd and 3rd commands from line 5 for each store / computer you wish to be able to access the master inventory data. Change the "store1" part of the command to whatever name you like, for instance you could use "store1", "store2" etc.
7. You will now have a ".key" and ".id" file for each store/ computer. The ".key" files should be copied to "c:\program files\zebedee" folder for each store/computer you want to give remote access to. The ".id" files need to be opened with notepad and combined into one file to be saved as "c:\program files\zebedee\clients.ids".
When you open each file it will look something like below, the "VistaPC" part shown below is a comment and can be changed to anything you like, such as "Store1".
dcd5eb31ce40ad7ace5bad21a978bfce83db04d6 VistaPC
After you save all the ID files together it should look something like below:
ba077f6a42bea502f517cab5685e476a713d9621 Store1
3ad38cb1f16957d5c535272ce27557bdaa4389c6 Store2
135f04050961d37553731250d5c6f7495f088b32 Store3
8. Save the text below into "c:\program files\zebedee\server.zbd" using notepad.
#-----------------------------------------------------------------
# Config file to use on a Server running Firebird & ZeBeDee
#
verbosity 2 # Message type
server true # Server Mode
detached true # Free from console
udpmode false # we don’t need UDP
#logfile './zebedee.log' # remove the 1st # in this line if you want to enable logging
keygenlevel 2 # Key level
# Below is the ID file you created from all of the store key files
checkidfile './clients.ids'
redirect none # Close all redirection ports
# Allows Firebird connections
redirect 3050 # Firebird default port
targethost localhost # target is on the same machine
# Some other parameters
compression zlib:9 # maximum zlib compression
keylength 256 # 256 bits keys
keylifetime 36000 # share keys last for 10 hours
maxbufsize 16383 # Maximum buffer length
#--------------------------------------------------------------
9. Add the icon/ link "Run Zebedee Server" to your Startup folder so it runs automatically when you start windows. This link can be found in "All Programs>Zebedee".
10. From your router setup find your routers IP address. You can also search online for "Whats my IP" to find your router IP. You will need this in the store setup below.
Setting up the remote (workstation) computers (computers running RTO Pro)
1. Download and install Zebedee (see link above).
2. Save your key file to the folder "c:\program files\zebedee\"
3. Save the text below into: "c:\program files\zebedee\client.zbd". You will need to replace the question marks in the line "tunnel 3051:??.??.???.??:3050" to your home office routers IP address. You will also need to edit the line "include './???????.key'" and replace the question marks with the name of the key file for this store, such as "store1.key".
#------------------------------------------------------------------
# Config File - Client
#
verbosity 1 # Basic messages only
server false # Client
detached true # Closes Console
tunnel 3051:??.??.???.??:3050
include './???????.key'
#------------------------------------------------------------------
4. Create a new link in your startup folder with the target as follows: "C:\Program Files\Zebedee\zebedee.exe" -f client.zbd
This will start your secure tunnel each time you start Windows.
5. In RTO Pro go into Setup > Store Setup and click on the Other tab. In the Master Inventory server name put the following: localhost/3051
In the "Path to database file on home office server" put the following: c:\rtoho\
The path above is the default path, if your path is different put the correct path.
Below is a screenshot of where you put the settings in RTO Pro. It is in Store Setup under the "Other" tab.
