Point of Sale Menu option "3"
Enter customers name or account number or part of their name and push ENTER then select customer from list. The maintenance screen will come up with the customers first contract shown, if this is not the contract you want to edit use the page down button to scan through the customers contracts, use page up to go back through them. After the contract you wish to edit or do a switchout on is displayed you then push F11 to edit the record or F12 to switchout or add an inventory item on the contract.
Toolbar buttons described below, please note you can see what functions are available from this page by looking at the buttons on the top of the screen.
F9 Term Change: This is to change the term (weekly, monthly etc.) on the agreement. When you change the term the payment amount will be adjusted automatically accordingly, you will be prompted with the new payment amount before it finishes the term change. If you wish to adjust the payment amount differently you can edit the payment amount after doing the term change by pushing F11 for Edit and change the payment amount field.
F11 Edit: When editing a contract use the tab key to move around to the fields you want to change (fields that can be edited will be yellow). When you are finished editing the contract record push ENTER.
Click here for questions about payment count and how it is calculated.
F12 Switchout: This is to switchout Inventory on a Contract, or adding items to a contract. After pushing F12 then enter a model or serial number to search for then select the new inventory item from the inventory list. You will then be prompted to enter the rental rate for the item (usually the same rate as the item you are replacing, but you can enter a different rate if needed) and the line # it is supposed to replace (the number to the left of the old inventory item, which is listed about half way down the screen). To add items to contract select the first empty line number. Push ENTER and the item will be put on the contract, to complete the switchout push ENTER then select yes, or you can do more switchouts by pushing F12 again. To see a video on how to do switchouts click here or goto this web address: http://www.rtopro.com/video_main.html
Print Screen: This will print out the information that is displayed on the screen.
Print Contract: This will print the contract for the current contract.
Assign to Another Account: You can assign an active contract to another account / customer by clicking on this menu item or by pressing Alt-A. You will be prompted for the account number you wish to assign this contract to.
Remove Inventory Item: You can remove inventory items off of active contracts by clicking on this menu item or by pressing Alt-R. You will be prompted to enter the line number of the item to remove. RTO Pro will automatically adjust the payment amount and contract amount. You will be shown the new figures and prompted if you want to continue. This function closes out the original contract as returned and creates a new contract with the remaining inventory items. The contract number for the new contract will be the original contract with a "-A" added to it. (The "A" being progressed alphabetically if it does not create a unique number). For more about this feature, click here.
A note about the Other Due field in contract maintenance.
Other Due: The other due field in maintenance will only show previous unpaid late fees and any other charges added to other charges due, it does NOT include current late fees. Current late fees are only displayed on the payment screen. So to remove a late fee completely you must remove it from the payment screen, take the payment, then go into maintenance and remove it from the other due field.
You can enable Autopay on a contract from the contract maintenance screen. The most basic Autopay you can enable by checking the "Pay by AutoPay" checkbox. Checking this box and setting no other options would make the contract be paid by autopay, the regular payment due, on every due date.
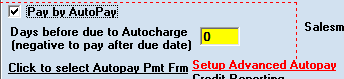
Other options are explained below:
Days before due to Autocharge: If customer wants to pay before or after their due date the same number of days every payment period you can enter that number here. If you enter a 2, the contract would autopay 2 days before its due date every payment period. Entering -2 would make it process through Autopay 2 days after the due date.
Click to select Autopay Pmt Frm: Click this link to select the payment form to use for this contract or to save new payment forms or edit saved payment forms..
Setup Advanced Autopay: This opens a box where additional choices can be made, to view the advanced autopay options click this link.