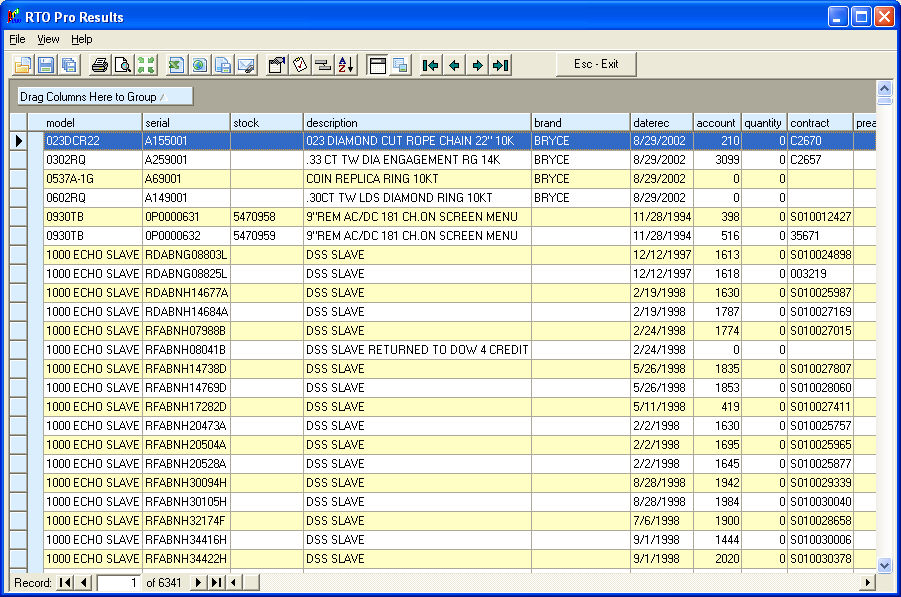
The Inventory Custom Report Viewer allows you to sort and group fields the way you like, you can also include only the fields you would like to have in the report. Below is a screen shot of the report viewer, explanations of the buttons are below the screen shot.
![]() These are the "Open", "Save" and "Save As" buttons. The Open button allows you to open a saved report layout. The Save button will save the current layout. The Save As button will allow you to save the current layout and rename it if it was previously saved.
These are the "Open", "Save" and "Save As" buttons. The Open button allows you to open a saved report layout. The Save button will save the current layout. The Save As button will allow you to save the current layout and rename it if it was previously saved.
![]() Clicking on this button will print the report.
Clicking on this button will print the report.
![]() Clicking this button will display a print preview of the report.
Clicking this button will display a print preview of the report.
![]() Clicking this button will toggle the "Fit columns to page when printing" option. When it is on, the columns will be shrunk so that all columns fit the width of the page when printed.
Clicking this button will toggle the "Fit columns to page when printing" option. When it is on, the columns will be shrunk so that all columns fit the width of the page when printed.
![]() Clicking this button will export the report in Excel Spreadsheet format. The file will be saved to your desktop and displayed in Excel (if you have it installed) after it is exported.
Clicking this button will export the report in Excel Spreadsheet format. The file will be saved to your desktop and displayed in Excel (if you have it installed) after it is exported.
![]() Clicking this button will export the report in HTML format. The file will be saved to your desktop and displayed in your web browser after it is exported.
Clicking this button will export the report in HTML format. The file will be saved to your desktop and displayed in your web browser after it is exported.
![]() Clicking this button will export the report in Text format. The file will be saved to your desktop and displayed in your default text editor after it is exported.
Clicking this button will export the report in Text format. The file will be saved to your desktop and displayed in your default text editor after it is exported.
![]() Clicking this button will Export the report and attach it to an E-mail using the RTO Pro Sendmail interface. You will be prompted to select a format to export in after clicking the button.
Clicking this button will Export the report and attach it to an E-mail using the RTO Pro Sendmail interface. You will be prompted to select a format to export in after clicking the button.
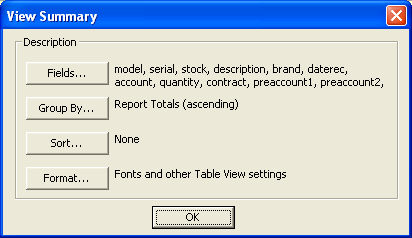
![]() Clicking this button will bring up the report summary information (Shown below), where you can make changes to the report layout.
Clicking this button will bring up the report summary information (Shown below), where you can make changes to the report layout.
![]() Clicking this button will bring up the form where you can edit the fields that are included in the report, you can also change the order of the fields on the report. Note: You can also change the order of the fields by clicking on the header columns and dragging. You can remove columns from the report by right clicking on the header columns and clicking on "Remove Column".
Clicking this button will bring up the form where you can edit the fields that are included in the report, you can also change the order of the fields on the report. Note: You can also change the order of the fields by clicking on the header columns and dragging. You can remove columns from the report by right clicking on the header columns and clicking on "Remove Column".
![]() Clicking on this button will bring up the Group form where you can change how the report is grouped. Note: You can also change the grouping from the main report screen by clicking on the header columns and dragging them to the grouping box above the columns.
Clicking on this button will bring up the Group form where you can change how the report is grouped. Note: You can also change the grouping from the main report screen by clicking on the header columns and dragging them to the grouping box above the columns.
![]() Clicking this button will bring up the sort form where you can change the way the report is sorted. Note: You can also change sort order by clicking on the column headers.
Clicking this button will bring up the sort form where you can change the way the report is sorted. Note: You can also change sort order by clicking on the column headers.
![]() Clicking this button will toggle on/off the Group box at the top of the report.
Clicking this button will toggle on/off the Group box at the top of the report.
![]() Clicking this button will toggle on/off the Card View layout of the report.
Clicking this button will toggle on/off the Card View layout of the report.
![]() You can use these buttons to navigate through the report records.
You can use these buttons to navigate through the report records.