RTO Pro integrates with QuickBooks, Quicken and other accounting software that can import IIF or QIF files. RTO Pro integrates by creating an IIF or QIF export file in the End of Day program. The export file RTO Pro creates will contain deposit and revenue information that can be imported as a deposit in your accounting software.
If you are using Quickbooks 2019(or newer?) see this page about the IIF import in the newest version of Quickbooks: https://bigredconsulting.com/quickbooks-2019-iif-import/ It appears Quickbooks has "improved"(broken on purpose??) the IIF import process. This page explains how to import IIF files using the old method with Quickbooks 2019.
To setup the export options go into the End of Day program and click on Setup. The IIF/QIF setup will be at the bottom of the setup grid. To automatically create the IIF/QIF files check the "Create a IIF/QIF export file when running the End of Day." checkbox.
The easiest way to setup the names is to print an account list from your accounting software. Not all accounts will be used by all stores, for instance if you do not do Cash Advance Loans the Cash Advance accounts will not apply to you. If you do an import in QuickBooks or Quicken and an account that is in the import file does not exist it will be created automatically. You could then edit the account and properly classify it.
Please note in Quickbooks if the account is a sub account you enter the name as follows: "Main:Sub". For instance if you had an account name "Revenue" with a sub account named "Rental" you would enter the account name in the End of Day setup as "Revenue:Rental". Quicken users only need to enter the sub account name.
Note: QIF / IIF files are only created when you save bank deposits in the end of day process, that is what gets put into the IIF/QIF files, your bank deposits and the revenue splits.
Below are the Account names that should be filled in to match the corresponding account names in QuickBooks/Quicken and the type of account they should be in QuickBooks / Quicken. For QuickBooks you can also enter a "Class" name, A class name is used to separate revenue by store or location. For instance if you have 2 stores you may have a class "Store1" and "Store2", this would allow you to separate revenue for the stores as well as run reports for individual stores in QB when you use classes.
Account Description |
Type of Account |
"Checking Account Name" |
Checking or Savings, the account you make deposits to. |
"Rental Income Revenue Account Name" |
Revenue |
"Retail Income Revenue Account Name" |
Revenue |
"Retail Interest Revenue Account Name" |
Revenue |
"LDW Income Revenue Account Name" |
Revenue |
"Club Income Revenue Account Name" |
Revenue |
"Other Income Revenue Account Name(Late fees/ Delivery fees)" |
Revenue |
"Check Cashing Fees Revenue Account Name" |
Revenue |
"Cash Advance Loan Fee Revenue Account Name" |
Revenue |
"Cash Advance Verification Fees Revenue Account Name" |
Revenue |
"Enter the name of your G-Type(As Agent) Rental Revenue Account in QuickBooks." |
Revenue |
"O-Type(Other) Rental Income Revenue Account Name" |
Revenue |
"Accounts Receivable Account Name" |
Accounts Receivable |
"NSF Check Account Name" Please note when an NSF check is loaded no value is passed by RTO Pro, only when an NSF is paid. When the negative transaction from the bank for the NSF hits your account it should go into this account. |
Expense |
"Sales Tax Account Name" For Quickbooks this CANNOT be "Sales Tax Payable", if it is QB will require a vendor and RTO Pro does not supply vendor info in the export file. |
Liability |
"Deposit Account Name" If you have purchase reserve enabled purchase reserve is also exported in this category. |
Liability |
"Cash Drawer Account Name" |
Other Asset |
"Shortage Account Name" |
Expense |
"Cash Advance Loan Outstanding Account Name" |
Accounts Recevable |
"Temporary Holding Account Name" |
Expense (Some people use their shortage account acct for this also, see below for explanation of the temp holding acct) |
Temporary Holding Account
The Temporary Holding Account is an account to hold amounts from multiple deposits for the same day. If you have multiple deposits revenue is split in just 1 transaction, the Temp Holding account is to make the split balance and account for the other deposits. An example is given below as to how this account works in QuickBooks to balance your accounts.
If you have $300 in total revenue for the day $200.00 was a normal cash and check deposit and $100 is credit card, it would be entered as below in QuickBooks.
Description |
Splits |
Split Amt. |
Deposit Amt |
|
Regular Deposit |
|
|
200.00 |
|
|
Rental Revenue |
285.00 |
|
*All revenue is booked in this transaction |
|
Tax Collected |
15.00 |
|
*All tax is booked in this transaction |
|
Temp Holding |
-100.00 |
|
*The temp holding is used to balance the transaction and to account for the CC deposit. |
Credit Card Deposit |
|
|
100.00 |
|
|
Temp Holding |
100.00 |
|
*When the CC deposit is entered the temp holding acct = 0 again |
|
|
Total |
Total |
|
|
|
300.00 |
300.00 |
*Everything is in balance |
Click here for a topic on NSF and Accounting
Any Petty Cash Payouts entered in RTO Pro will be imported into QuickBooks with the Category that was used in RTO Pro as the account name in QuickBooks.
The export files that are created will be saved in "C:\RTOwin\HomeOffice\" on your SERVER computer. They will be named as follows: "Store01 03-21-2008.iif". The store would be the store # for the store creating the file and the date created. The IIF files will be sent to your Home Office along with your normal day end stuff if your company uses the RTO Pro Home Office.
To import a IIF file into QuickBooks do the following: Click on File > Utilities > Import > IIF Files.
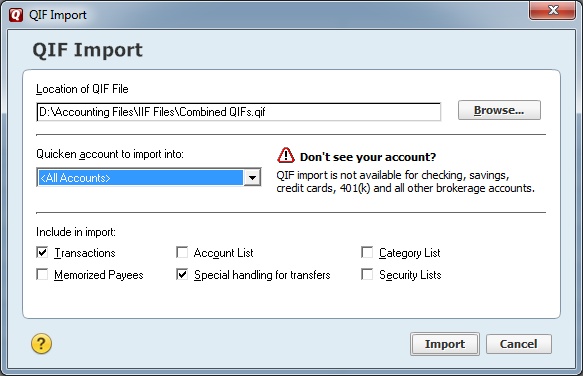
To import a QIF file into Quicken do the following:
1. Click on File > File Import > QIF File. (You can also create a button bar button for this function to make it easier to get to)
2. Ignore where it says "Quicken account to import into", the account it imports into is set in the settings shown above in the End of Day setup.
3. Make sure only the 2 following option boxes are checked: "Transactions" and "Special handling for transfers".
4. Click the "Browse" button and browse and select the QIF file to import, then click "Next".
5. It will say "Transactions found for "You checking account name", Import Transactions" click yes then accept the transactions.
Below is a screen shot from Quicken 2012 that shows what the settings should be to import QIF files. Ignore the message "QIF import is not available for checking, savings..." You can import transactions into checking accounts, you just select "<All Accounts>" from the drop down list.