The Automated Collections Module (ACM) is used to automatically dial your customers and play a pre-recorded message. It has a recording mode built in that you can use to create the recordings you wish to use. Once started it will dial all the customers in the list you create unattended. For the overdue and broken commitment list it will check the customers record before calling and verify they are still overdue and have not given a new commitment, if they have they will be skipped.
You can create overdue customer lists to call by entering up to 5 different due date ranges and selecting the message you wish to play for each date range. You can also setup a different message for broken commitments if you wish. The ACM may also be used to call your new customers, as well as an option for all customers. You can also setup dialing rules so the ACM knows how to dial your customer's phone #'s (when you have to dial a 1 or the area code).
The ACM can also be used to send text messages to your customers if you have an RTO Pro Text Messaging account.
Directions for each mode are below.
Setting the Automated Collection Module to run unattended on a schedule.
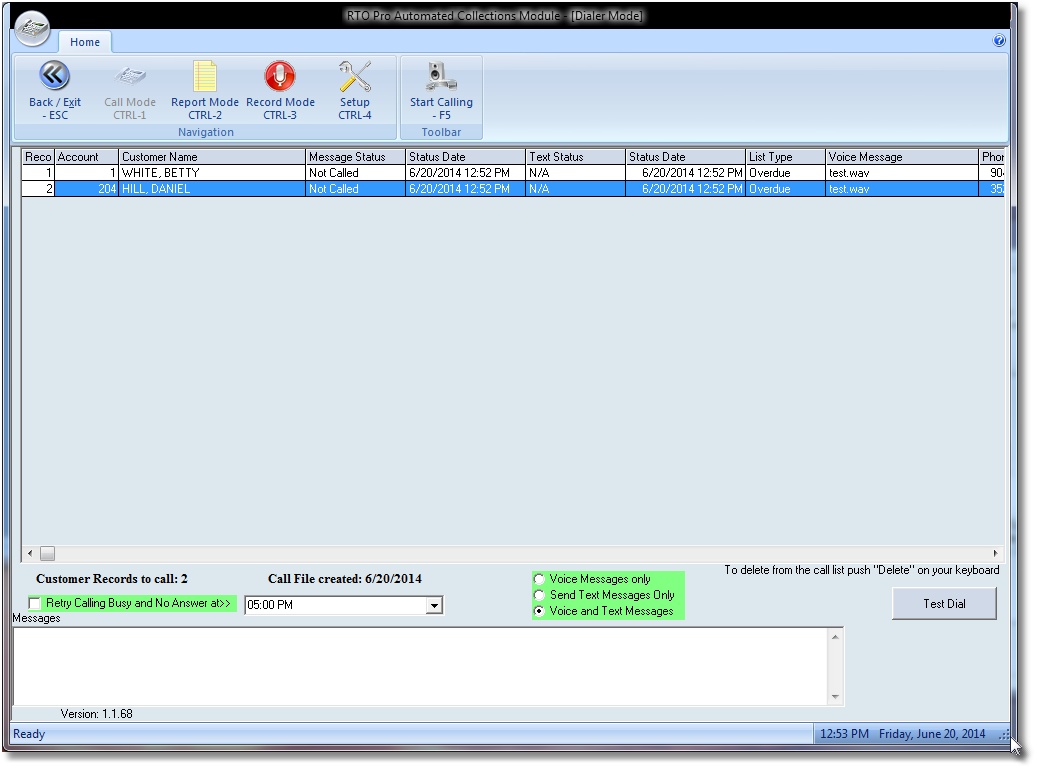
In dialing mode a grid will be displayed with the customers in the call list. The fields are explained below:
"Record" is the record # in the grid.
"Account" is the customers account number in RTO Pro
"Customer Name" customer name
"Message Status" this is the status of the message for this customer, see below for status's.
"Status Date" this is the date and time the status was reported
"List Type" this is the call list type the customer belongs in (Overdue, All Customers, or Contract Date)
"Message" this is the message that will be played when calling this customer
"Phone#" customers home phone # from RTO Pro data
"Cell#" customers cell phone # from RTO Pro data
Message status's
"Not Called"means nothing has been done yet with this customer
"Called, Busy" their # was called and it was busy
"Called, N/A" their # was called and there was no answer
"MSG Delivered" the message was delivered
"Paid" since the customer list was created this customer paid or gave a new commitment
When you click on the" Begin Calling" button the ACM will start dialing customers in the call list. When customers are called their record will be highlighted and also the message status box will display call info. As messages are delivered the status will be updated.
If a customer gives a new commitment after the call list is created they will not be called, also if they pay a payment on any contract after the call list is created they will not be called.
If messages cannot get through because of a busy line or no answer, you may set the ACM to retry those calls with the check box in the bottom left (highlighted in green).
In Report Mode you create a call list by entering up to 5 different due date ranges and selecting the message you wish to play for each date range. You can also setup a different message for broken commitments, a message for ALL customers, or for a date range by contract open date (for calling new customers).
The priority is from top to bottom, so if the date ranges you enter includes the same customer in 2 different ranges the topmost range is the message that would be played for that customer.
Each customer will only be placed in the call list 1 time even if they have multiple contracts that fall into different ranges. If a customer has a current commitment they will not be included in a call list. For the broken commitment section if the customer has paid on or after the commitment date it will not be considered a broken commitment even if the customer is still overdue.
The layout of date ranges and respective messages that you create can be saved with the "Save This Layout" button, ready to be loaded at another time. The date ranges you save will progress forward and stay current. For example, if you select a message to play for all customers who are 30 days overdue and you save that layout, next time you load that layout it will move the dates forward as needed so you are still only calling customers who are 30 days overdue.
If you wish to call all customers who were due before a certain date, or want to play one message for all your late customers, simply leave the first due date blank. Then enter your chosen due date (or today's date if calling all overdue customers) in the second field.
You may choose which customer ratings/statuses you want to include in the call list.

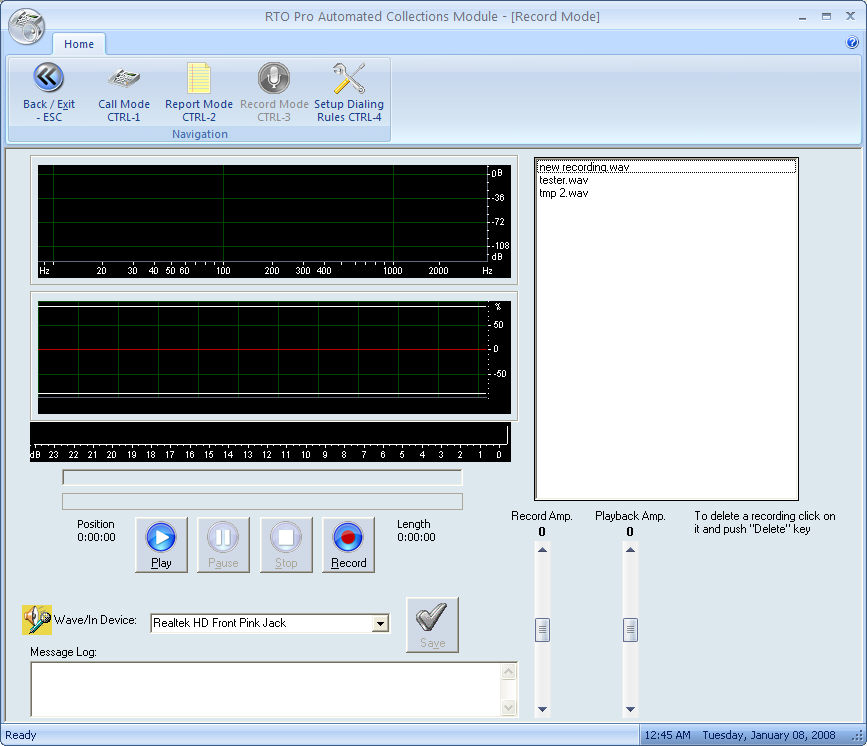
In Recording Mode you can create and manage messages to be played to customers.
To create a new recording you need to have a microphone plugged into the Mic input for your sound card, select your sound card device in the drop down list and then click on the "Record" button. When you are finished recording click "Stop" then click on the "Save" button to save it. You will be prompted to enter a file name and the recording will appear in the recording list on the top right of the screen.
To delete a recording, select the recording you wish to delete and click the "Delete" key on your keyboard.
You can also play any recording in the recordings list by selecting it and pushing the "Play" button.
The recordings you create will be available to select from the Report Mode.
Note: It is a good idea to repeat your message twice when you make the recordings. The reason for this is because if the dialer gets an answering machine your message will start playing as soon as it hears the answering machines recording, so if you repeat your message twice the answering machine will record the repeated message. It is also a good idea to make the entire message at least 40 seconds long or longer.
Note if you are going to record your audio files outside of the Automated Collections module the files must be in WAV format, PCM 8.000 kHz, 16 Bit, Mono.
The Setup Mode is where you setup dialing rules for your area (when using a modem instead of the Cloud).
You have to enter the area code for your store and any number that must be dialed to get an outside line (if required). Also make your choice for cell phone option.
The default dialing rules are as follows:
If a phone number is in the same area code 1 and area code will not be dialed.
If a phone number is in a different area code 1 and area code will be dialed.
If all of the numbers in your area follow these rules you do not need to enter any rules. If there are exceptions you need to enter rules for these exceptions.
Every area is different and has different dialing rules, contact support if you need help setting up your dialing rules. Some examples are below. Please note dialing rules do not need to be setup if you are using the Cloud based service.
For example: If your store is in 352-383 and to call 352-759 or a 352-850 # you have to dial the area code you would enter rules like the 2 shown below.
Area Code |
Prefix |
Dial 1 |
Dial Area Code |
352 |
759 |
|
X |
352 |
850 |
|
X |
If your store is in 352 area code but to dial a 407-555 # you do not have to dial a 1 or area code enter the rule shown below.
Area Code |
Prefix |
Dial 1 |
Dial Area Code |
407 |
555 |
|
|
If your store is in 352 area code and your area requires 10 digit dialing enter the rule like below
Area Code |
Prefix |
Dial 1 |
Dial Area Code |
352 |
|
|
X |
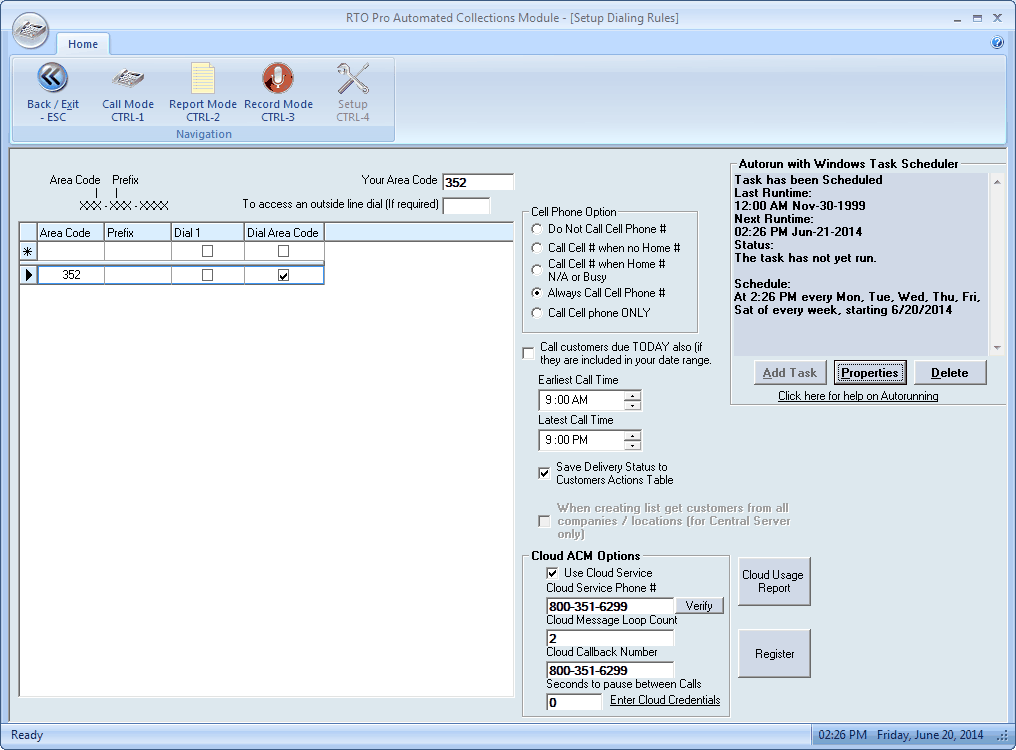
You may also set up an Autorun with Windows Task Scheduler, right from the ACM Setup screen. Click here to view the help topic on Autorunning.
If you are using the Cloud Service to make phone calls, you'll need to set up your Cloud ACM Options. (You'll also need your FTP user name and password saved in your Store Settings. Call tech support at 352-383-9375 for help).
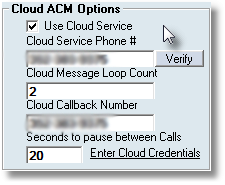
Check the "Use Cloud Service" check box and enter in your Cloud Service number. You will need to verify this number. Click the Verify button and your phone will be called and you will enter a code that will be provided for you. If an extension is needed for verification, you will be able to enter one before the number is dialed.
This number will show up on your customer's caller ID, so if you want them to call you back on a different number you'll want to include in your messages "Press one to call back." and when they press one on their phone they will be redirected to whatever number you put in the "Cloud Callback Number" spot. If using the same number for call backs, just enter the same number twice. If you want the callbacks to dial an extension put commas after the number then the extension, each comma would make it pause .5 second. For instance to make callbacks dial 352-383-9375, then wait 1 second and dial extension 100, you would enter: 352-383-9375,,100
You may choose how many seconds you want the ACM to pause between phone calls if you don't want your line tied up the whole time it's running.