Backing up your data is very important! Data should be backed up at least once a day and at least once a week a backup should be made and removed from your store for storage at another location or some kind of internet backup should be done where your data is stored on a server outside of your building.
This backup program compresses the files to use as little space on media as possible, but it is recommended that you use a mass storage device like external hard drives or USB thumb drives. Backing up to CDR's is not recommended, however if you wish to use CDR's see the topic here for help. External hard drive or USB drives are much easier to use and are inexpensive. These devices hold much more data and are more reliable than CDR's.
Some tape backup drives cannot be accessed by this program. If your drive cannot be accessed through a drive letter or path then you must use the backup program that came with your tape drive to perform backups.
The backups made by this program are zip files and can be accessed by other programs like PKZip, Winzip and many others.
Data Backup:
The data backup button will perform a backup of RTO Pro Data files only. This is all that is needed for backups in most cases. In the event of hardware failure to restore a data backup on a new computer you would need to install the original setup for RTO Pro and the latest update you have installed for RTO Pro then restore the backup. See figure 1.
Please Note: Things that are not backed up in a DATA backup include copies of depreciation and flip reports, customer images scanned through document imaging, the physical file copies of the last 1000 receipts, copies of the last 100 reports ran.
When you click on this button if you do not have a backup directory setup you will be prompted for one. You can backup to any directory or drive that is accessible through Windows Explorer, including USB hard drives or thumb drives etc.
Full Backup
The full backup button will perform a backup of all RTO Pro files that are in the program directory. The only files that are not backed up are the shared files for RTO Pro which are in the Windows System directory. In the event of hardware failure to restore a full backup on a new computer you would need to install the original setup for RTO Pro then restore the backup. See figure 2.
When you click on this button if you do not have a backup directory setup you will be prompted for one. You can backup to any directory or drive that is accessible through Windows Explorer, including USB hard drives or thumb drives etc.
Note about Document Imaging Images
For Full backups you have the option to exclude document imaging files. If you have hundreds of megabytes or gigabytes of images the RTO Pro backup program will not be able to back them up. Even if they could fit in the maximum file size of the zip files created backing up that much data would be very slow. Image files are more static than data files, so backing up every image file you have every night would be very time consuming and not necessary. Image files are better to backup up just 1 time, then only backed up again when the image changes, which would be rare. For this reason the best way to backup image files if you have a lot of them is with an online backup service like Carbonite. If you backup your images with Carbonite or other service like that it would back up the files one time, then only add the additional images you create and update any that are edited.
An alternate backup method for images would be to copy them to an external hard drive, but it would be time consuming copying all the the images on a daily basis, or manually determining what images need to be copied. You could also use file sync software to backup images to an external hard drive. It would work similar to Carbonite, except it would just backup locally the new and changed images. There are some free file sync software packages available if you search online, RTO Pro would not provide support for using any sync software or the Carbonite service.
Change Backup Path
Click the change button if you wish to change the backup directory you have previously setup. When you click this button, a directory selection dialogue box will pop up and you can select which path you want your backup to follow. You can backup to any directory or drive that is accessible through Windows Explorer, including USB hard drives or thumb drives etc. See figure 3.
Restore
To perform a data restore click on the menu item "Restore Functions" on the top left side in the RTO Pro backup program. This menu button will restore a backup set. This should only be used in case of hardware failure when data files are lost or inaccessible on your computer. This will restore data to the state it was at the time backed up. NOTE: ANY CHANGES MADE TO DATA AFTER THE BACKUP WAS MADE WILL BE LOST WHEN A RESTORE IS DONE. See figure 4.
As a precaution before the backup is restored a Restore Backup is made and stored in the "c:\rtowin\backup" directory. This backs up the files in their current state before the restore takes place. Because of this feature a restore can be reversed returning data to it’s original state before the restore.
After pushing this button you will be prompted for the data file to restore. Backup files name include the data backed up the the job #. The job # will be 1 unless more than 1 backup was made the same day in the same directory, then they are numbered sequentially. Make sure you select the latest backup job when restoring.
NOTE: BE VERY CAREFUL WHEN PERFORMING A RESTORE. THIS FUNCTION CAN CAUSE DATA TO BE LOST. FOR INSTANCE IF YOU DO A BACKUP ON MONDAY NIGHT AND RESTORE THAT BACKUP THURSDAY, TUESDAY’S AND WEDNESDAYS TRANSACTIONS WILL BE LOST.
A RESTORE SHOULD ONLY BE PERFORMED AFTER CONSULTING WITH RTO Pro SUPPORT STAFF FIRST.
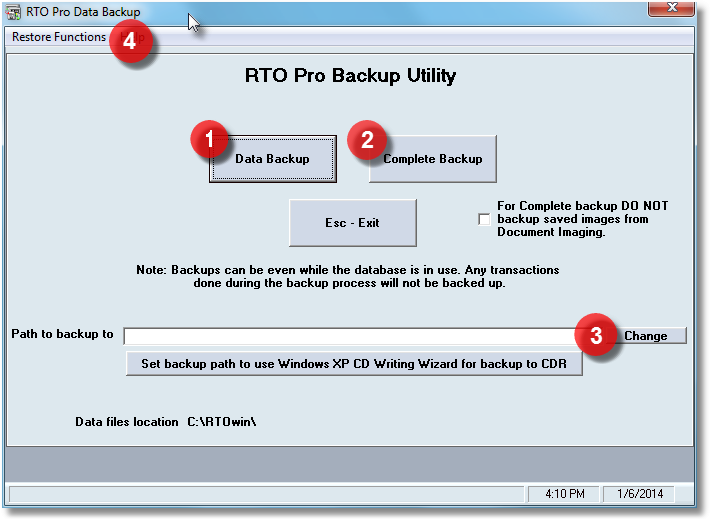
Figure 1 DATA BACKUP, Figure 2 COMPLETE BACKUP, Figure 3 CHANGE BACKUP PATH, Figure 4 RESTORE FUNCTIONS
Command Line Options and Automating Backups
Please note backups can be done automatically when you run the End of Day program, see the setting in setup for the End of Day (Go into the End of Day and click the "Setup" button). The RTO Pro backup program can also be automated to perform backup whenever you like automatically using Windows Scheduler, see below.
Please note: These instructions for Windows Task Scheduler are here for your convenience, we do not provide support for setting up or troubleshooting Windows Task Scheduler. We only provide support for our own software.
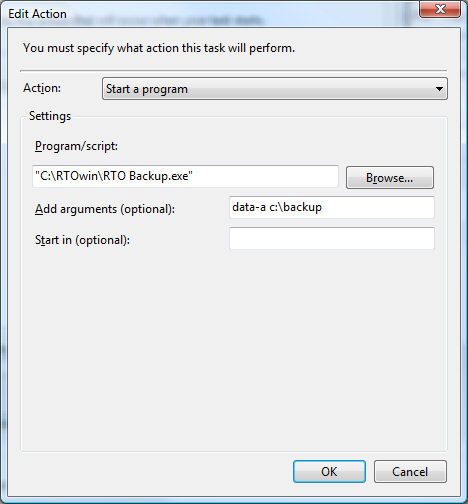
The RTO Pro Backup Program accepts command line arguments so the Windows Scheduler can start it. This gives you the ability to automatically do backups at any given time and on whichever days you want. You must set it up in the Windows Scheduler the command line options are as follows.
"full" means full backup
"data" means a data backup
Optional "-a" for append or "-o" for overwrite. This is for your choice when using an external disk that is not empty (this setting is optional).
Optional "-d " will put the backup program in debug mode and all messages will be written to the local operating folder in a file "backuplog.txt". When backup is run in automated mode all errors will be written to the log file, when in debug mode all messages that would normally be displayed on the screen will be written to the log file.
After the switches above add the path to backup to.
This is what the Run line should look like in the Scheduler
"C:\RTOWIN\RTO Backup.exe" data-a a:\
This would do a data backup to the A: drive and would append if the disk is not empty.
"C:\RTOWIN\RTO Backup.exe" full-o e:\
This would do a full backup to the E: drive and would overwrite if the disk is not empty.
"C:\RTOWIN\RTO Backup.exe" full-o-d e:\
This would do a full backup to the E: drive and would overwrite if the disk is not empty, it would operate in debug mode.
Note: If you check the box in Windows Task Scheduler "Run whether user is logged on or not" you CANNOT use a mapped drive as the backup destination, mapped drives are only available when a user is logged on.
The image below is a screen shot of how you setup the scheduler. The example below would do a data backup to the "c:\backup" folder.